

I bought my house back in 2014, when I had just finished my sophomore year of undergrad - and renting for one year made me feel like I was throwing money away. I started looking for houses and I really wanted a historic townhouse – but it turned out that was out of my price range… So, I found this place and it was modern (precast concrete panel ceilings, steel, aluminum storefront windows) – but it was downtown, and it had a garage – so I could make it work. The place was a Home Depot special – basic off the shelf lighting, plumbing, appliances, trims, finishes – everything. My main problem was the kitchen – the front door opened into the kitchen – which had a good layout, but average everything else. Black Galaxy Granite Countertops and a 4” backsplash, fake wood “dark cherry” cabinets, a dead cat space above the cabinets (I call the space between upper cabinets and the ceiling a dead cat space), “stainless steel appliances” - with black plastic trim… oh – and the red glass pendants. Then there was a leak in the wall which caused a lot of mold behind the drywall – so I ripped out all the metal studs, insulation, and drywall over the precast concrete building structure and sealed the concrete. Right around this time I also took up the bamboo flooring and polished the concrete and sealed it as well. I thought that I would really push the industrial side and go for as much concrete as possible.

Over the years I did little changes, like painting the backsplash a different color. Then I tiled it and added under cabinet lighting. Meanwhile changing the pendants – before realizing it was the layout and getting one larger fixture. Then my appliances started dying which was the first real push to make some real changes to the kitchen. The refrigerator went first, and I could not justify buying a refrigerator that was not panel front. So, I saved up and made do without a refrigerator for a little bit and finally bought one – a panel ready 7’ tall aluminum box. This required removing the cabinet above where the existing refrigerator was – so that one came down. The dishwasher was shortly departed thereafter – and of course I had to get a panel ready one. I cut a piece of plywood as a temporary panel on this. Then I was tired of the cheap tile backsplash and was removing it, and when I put the stove back in it shorted out the entire house. It turned out the person who wired it to begin with did it wrong and it caused the plug to melt… after that I didn’t feel comfortable using that stove anymore – so I got rid of the stove and microwave “combo” – and then went the upper cabinets entirely. My house only has 8’ ceilings – so once the upper cabinets were gone it really opened up the space.

This is when things really got going. I had a kitchen island, two bottom cabinets, a handle-less metal box refrigerator, a rough plywood dishwasher, and an induction hotplate on the counter. The renovation process is not always pretty or glamorous. This forced me to start thinking and planning the future of the kitchen. I have always loved the look of ebonized wood, so I started looking into the process of how to ebonize wood and what the best products and woods are for it are. Ash turned out to be one of the best woods for ebonizing because of its strong graining which is heightened by the ebonizing. When ebonizing there were two products I used, stain (Old Masters Stain, Spanish Oak) and dye (Mohawk Ultra Penetrating Dye Jet Black). The stain stained the grains of the wood while the dye penetrated thee pores of the wood and made the wood totally black. Two coats of each made each piece perfectly black (the dye is alcohol based so it dries almost instantly, making it an easy 2 steps). Then I followed this up with two coats of tung oil (which is a great finish because you can easily touch it up as time goes on). My slab dining table is also finished in tung oil (I will go into that project another time) but the finish has worked great in the past. Before I knew it, I had a pallet being delivered with three hundred pounds of ash. I started rebuilding my existing cabinets to accommodate drawers, painted the frames since you cannot see them, and installed drawer hardware (Blum Tandem Soft-Close). I ordered drawer boxes from: https://cabinetdoor.store/product/maple-dovetail-drawer-box/ which were more than perfect. I did not feel confident making these – especially dovetailing – so these were my one item I thought I would splurge on and have made for me. Meanwhile I was cutting, gluing, staining, dying, and oiling all the panels for the kitchen (the larger panels are boards glued together). This was tedious since each side must dry and the be flipped and done again – repeat -repeat -repeat. I also used the Richelieu Contemporary Metal Edge Pull for all the cabinets which were not the appliances or trash. I routed the top of each of the panels the thickness of the pulls so that they are flush with the top of the door/drawer (a step which was much more work than it was worth – would not recommend). For the appliance pulls I used Buster & Punch’s Pull Bar in Black – in various sizes.


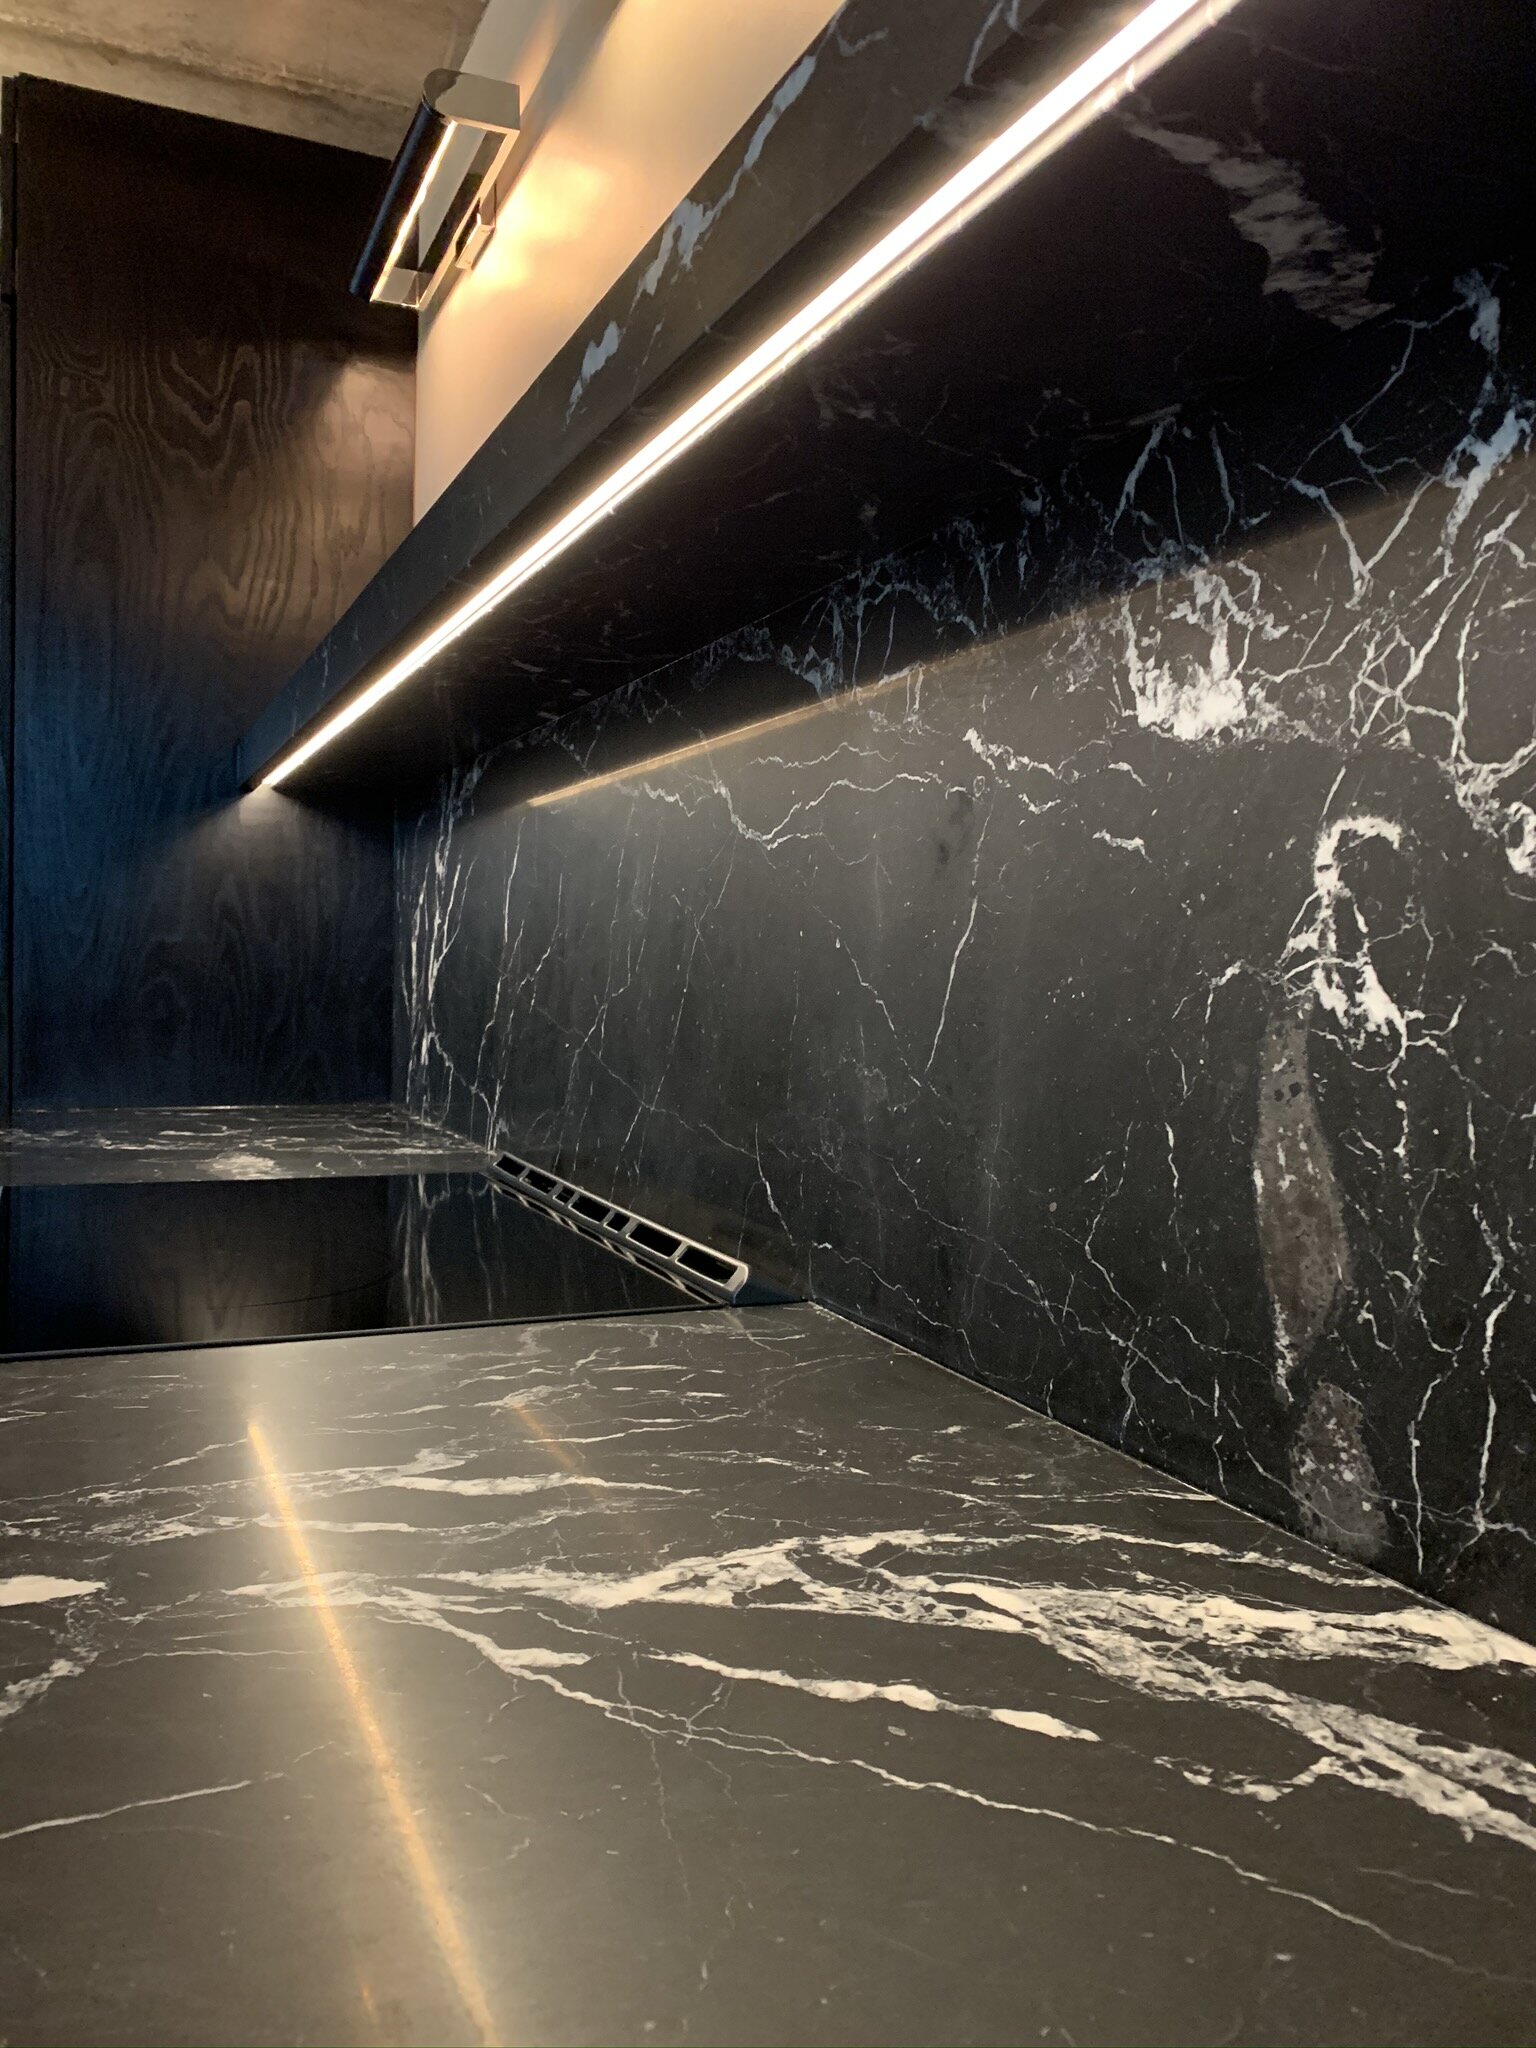
I had seen the floating stone shelf concept around – and I had always loved the idea of it. But I knew that for my kitchen it might be difficult to accomplish since it would be a lot of work – and in retrospect it was. I originally had to repair the drywall from the backsplash removal. Then repair the holes in the drywall I cut to wire the picture lights and run a line for the shelf LED. After repairing the drywall twice, I then realized that I needed to open the wall up yet again to install steel brackets to hold the stone shelf up. I really should have planned this all out and then I would have only had to open the wall up once and never repair it. My house has metal studs which meant that to structurally attach something to them I needed to add a lot of extra structure. I used: https://ironsupports.com/products/hidden-granite-countertop-l-bracket and bolted them to 2x10’s which I screwed in between the metal studs. Moreover, I screwed plywood the same thickness as the drywall to the metal studs and the 2x10’s. This way the steel brackets are tied into the studs, 2x10’s, and the plywood – so there was no way that the shelf could collapse (I like to overbuild everything). The backsplash would cover all of this, so it did not matter how any of it looked. I just had to make sure that the brackets were all very in line with each other. The shelf is made out of two pieces of marble and a core of plywood which is notched out around each of the steel brackets. It is possible to omit the plywood and route one of the layers of marble – but I wanted the added strength. I also used 3cm marble, and most times that I have seen this done it was with 2cm, which is thinner and lighter – this results in a thinner shelf. 2cm is harder to find and more limited in what stone options you can get. My existing counters were black galaxy granite and the polished finish showed every speck of dust, and the reflection made them always look dirty. For the new counters I knew I wanted Honed Nero Marquina with bold veining – and that is what I found. Unfortunately, right I wasn’t able to do the island as part of this installation – but it doesn’t look terrible with the granite (it just makes the granite look cheaper). The plus side is that granite is a workhorse – so I can really use the island as a workspace. Whereas the marble, is a much more fragile surface which needs to be cared for more gently. I do like and appreciate worn marble, but not right away. I have a 1920’s French marble-clad bakers cabinet with a beautiful worn patina, right across the kitchen. Since I just had this marble put in – I need to wait a few years before it begins to show patina at least. For the Waterworks faucet I needed to have another hole drilled in the island and the existing hole had to be enlarged – because they couldn’t have used a standard size hole. But, in the end it was well worth replacing my drop-down spray faucet with a fake metal finish from Home Depot – with the Waterworks Regulator. It’s the first thing you see when you walk in the door. A real statement piece for the kitchen which looks great in front of the stone backsplash backdrop.


One thing I really focused on with the kitchen was lighting. I included lighting inside of the drawers on the sides of the range. I used the Hafele LOOX Drawer Strip lights in 3000K which look fantastic. In the stone shelf I used the WAC Pro 2 2700K LED tape light with the InvisiLED aluminum deep channel. The picture lights are Circa Lighting’s David Art Light’s in 18” and 24”.

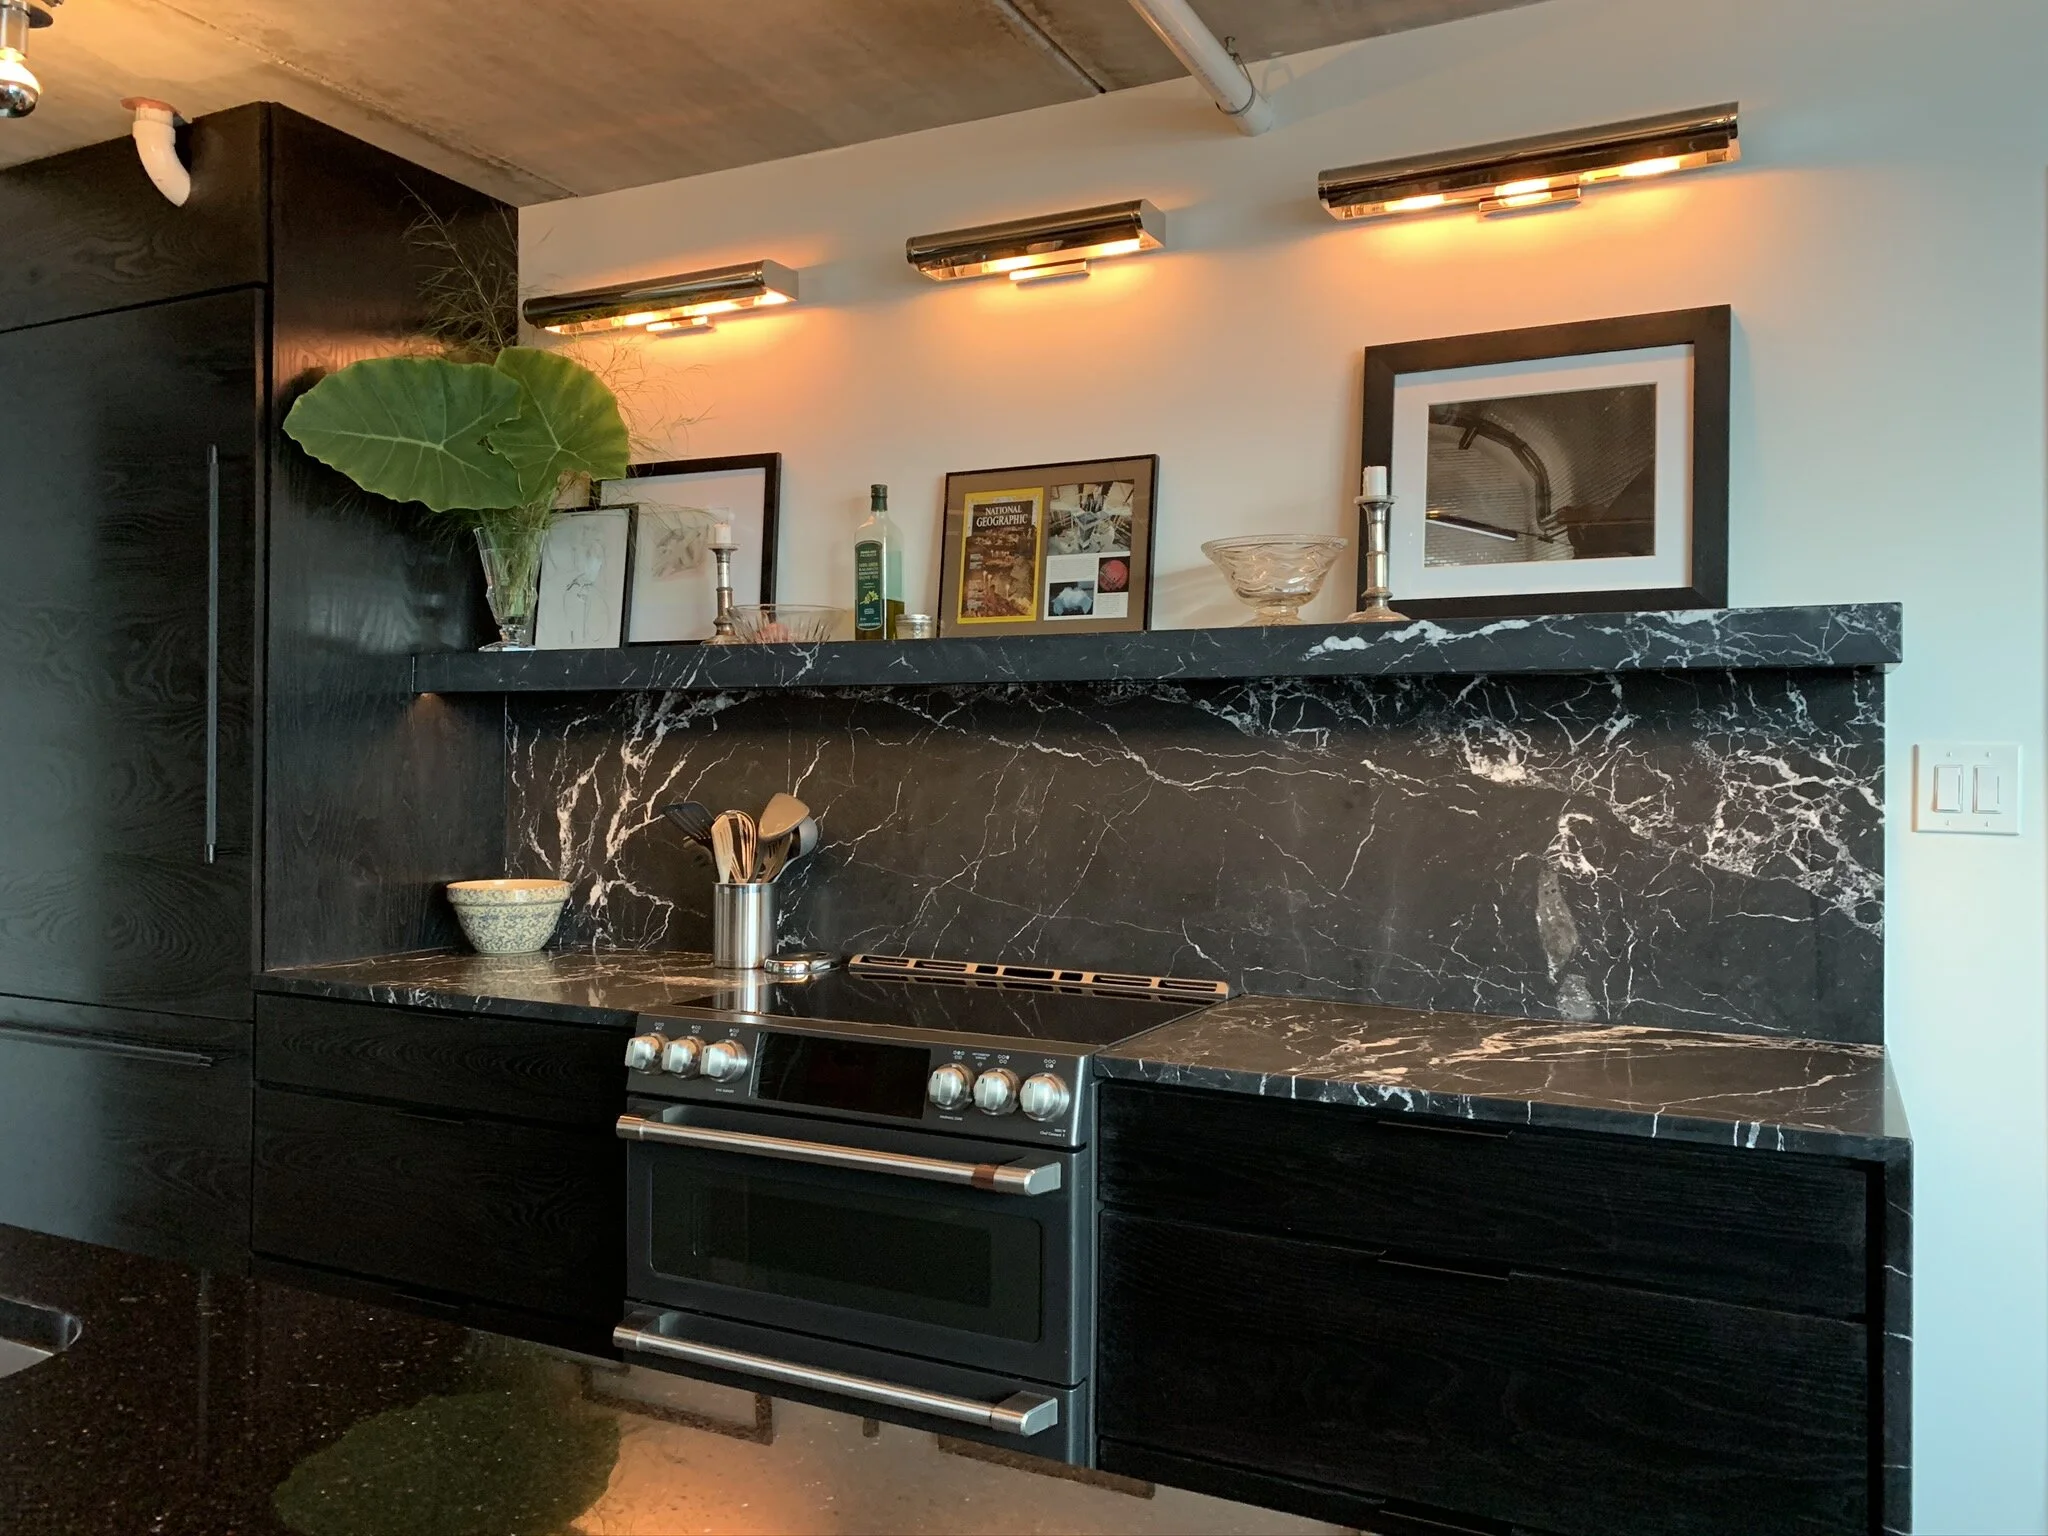
I almost forgot about the bar. I bought a used Sub-Zero wine fridge quite awhile ago and wanted to build it in somewhere ever since. My guest bathroom had a small hallway which connected to the kitchen. So, I decided to close that off and build a dry bar. That way I could build in the wine fridge and some drawers. I removed the existing wall and door to the bathroom, built a new wall and lowered ceiling, ran new electrical, and drywalled the niche. Then I bought a premade cabinet from Home Depot and retrofitted it like my existing cabinets for drawers and had drawer boxes made. Had matching marble cut for this area and put it all together. For the back wall of the niche I used a Schumacher velvet which I upholstered to a board which fits snugly against the back wall. The upholstery adds an interesting visual touch while limiting the echo of the niche.


I hope this was helpful.
Best,
Eli
